|
#102
 01-13-2011, 08:15 AM
|
||||
|
||||
|
Quote:
I just replied to you on the Lott thread as well. See what's there as it's on topic about Lott. Once again, there are actually 3/three John Lott's. The eldest married in London in 1775, not a Luthier and possibly (POSSIBLY) came from Germany and was a furniture/cabinet/chair makers or whatever. @nd was the son born J.F. Lott in 1776 and then 3rd, HIS son J'F' Lott Jnr. aka Jack Lott. On the Snr./Jnr. thing if anyone cares, the same thing happened with William Forster. The first Maker in London was William II but was known as Old Forster. His father, also William Forster was a Violin maker in Brampton and never worked in London. William Forster III was called Young Forster and employed Samuel Gilkes. Young F' had two sons, William IV (no other title) and the youngest was Simon Andrew who was trained by IV and Gilkes according to even S.A himself in his own book written decades later. So, this Snr, Jnr type stuff gets confusing BUT, it's good to know what you are actually making a copy of especially is that person did not make basses by trade. Sorry for the rant.. \Oh, and the British refer to J.F. Lott the bass maker from Dodd as 'Grandfather Lott' to make it even more confusing. Perhaps he was to some the Grandfather of the flat back Maggini style/model London bass, maybe. Panormo made them with roundbacks so that's the main difference besides doing it there 10 years before Lott ever touched a bass.
__________________
Ken Smith ~ http://www.kensmithbasses.com http://www.kensmithbasses.com/doublebasses/ http://www.facebook.com/KenSmithBasses https://www.instagram.com/kensmithbasses/ https://www.facebook.com/ken.smith.904750 

|
|
#103
01-13-2011, 09:45 AM
|
|||
|
|||
|
Quote:
|
|
#104
01-26-2011, 06:20 AM
|
||||
|
||||
|
Here we go again.
Remember the scroll badly glued with lashings of PVA?  Well I had to break the "repair" open. Very carefully. 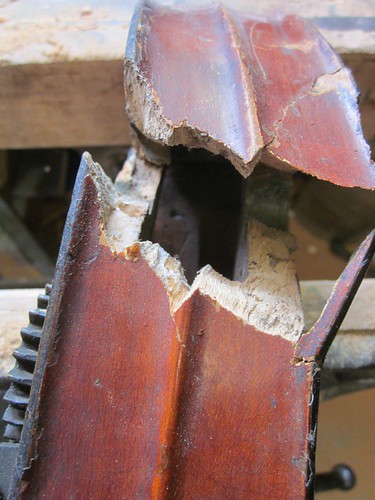 Its very hot and humid here in Sydney and not a good time to be gluing neck blocks so I'm going to clean out all the PVA. Here's my workshop for the afternoon:  The equipment 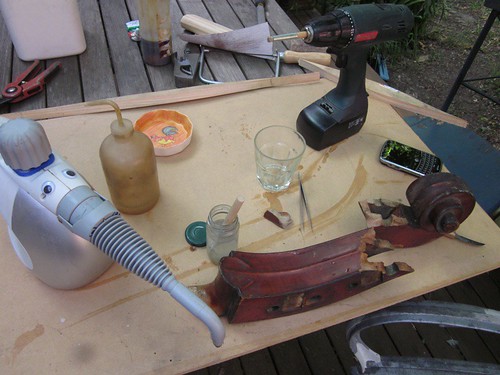 The PVA mess 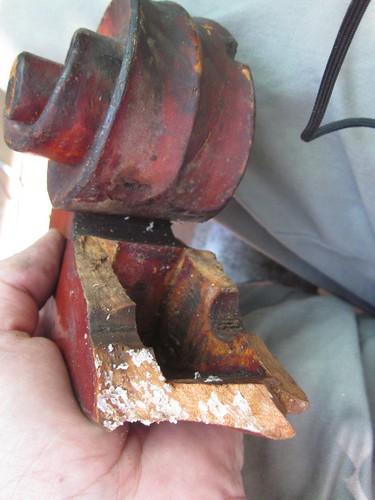 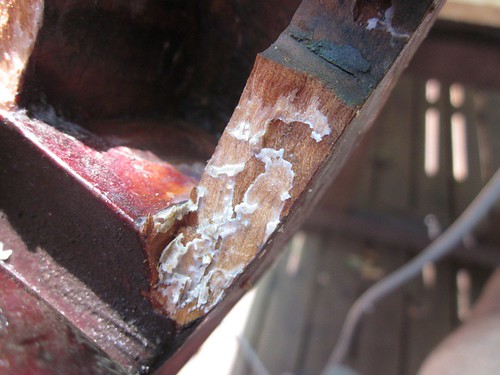 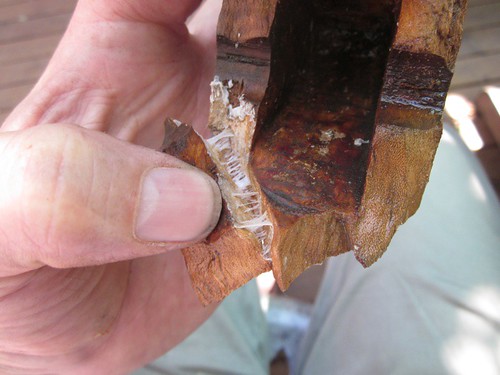 VERY fiddly job. Steam, vinegar, stiff brush, pick pick pick with sharp knife and tweezers and a LOT of patience. More like dentistry than luthiery. All done with a 10x magnifying visor, too. 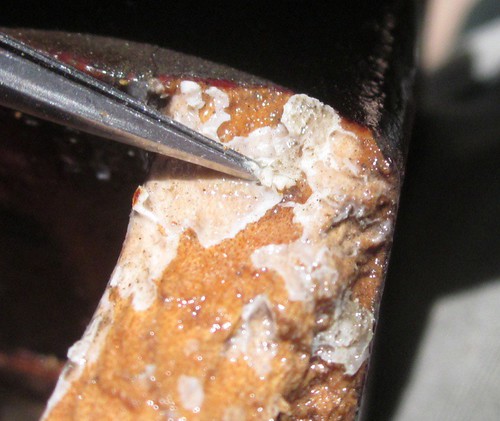 Scroll side cleaned up 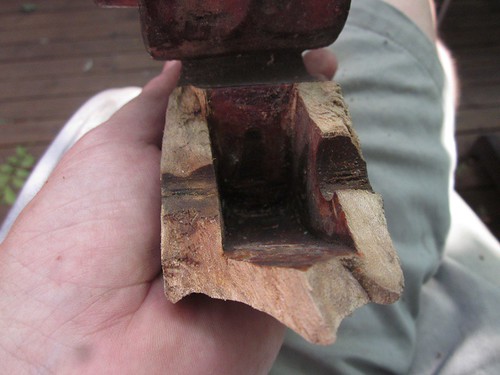 Last edited by Matthew Tucker; 01-26-2011 at 06:39 AM.
|
|
#105
01-26-2011, 06:20 AM
|
||||
|
||||
|
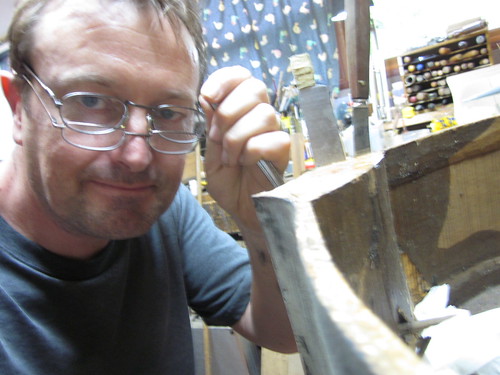
In this very odd photo of my leg and thumb, on the back of the scroll you can see a fracture where the pegbox is almost breaking through.
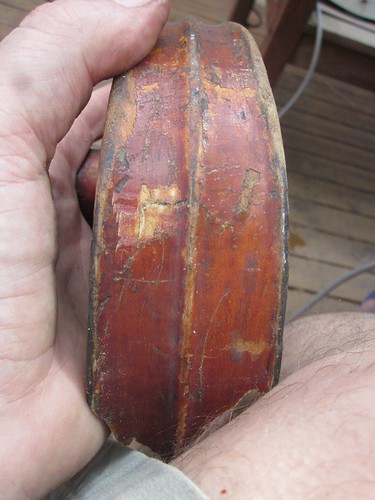 More rubbery goo. 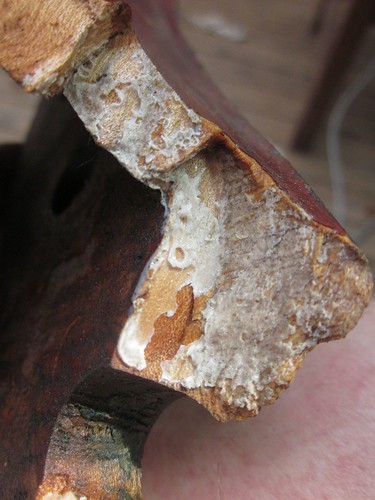 Before and after. 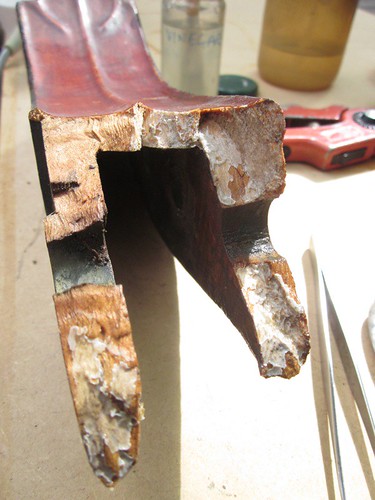 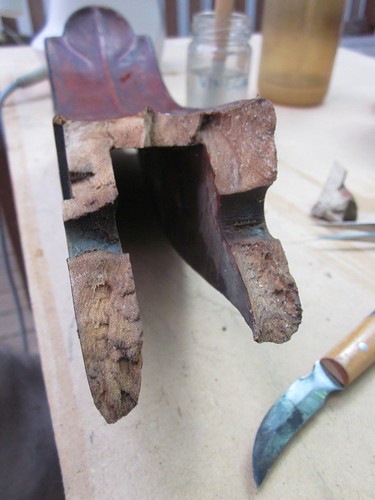 Much better. A bit daunting to think that this all has to glue back together and be strong enough for a neck graft later. You wouldn't think it, but probably an hour and a half's work all up :-( The only mishap was when I took a swig of old vinegar instead of my glass of ouzo and ice. 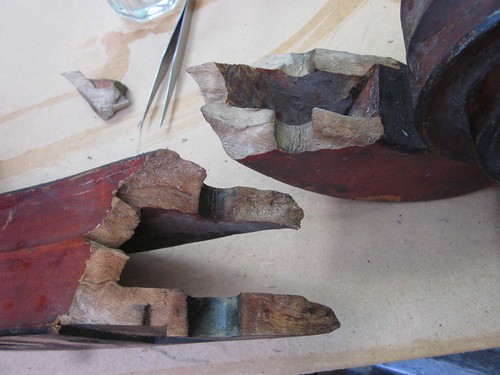 In all this closeup work I've had a good look at this head. VERY long, nicely cut, blackened chamfers, and I think it's beech, not maple. Last edited by Matthew Tucker; 01-26-2011 at 08:38 AM.
|
|
#106
01-26-2011, 11:24 AM
|
|||
|
|||
|
Question, will the neck graft become the main structure of the broken up scroll now? It seems amazing that this thing would stay together.
|
|
#107
01-26-2011, 12:42 PM
|
|||
|
|||
|
Matthew, what is your repair strategy? Are you going to deeply re-cheek the sides of the pegbox to strengthen it? Considering that it broke right at the tuner shaft, my fear would be that it's likely to happen again unless heavily reinforced. I'm sure you've thought of the same thing. Would you consider having your neck graft join up by the volute, creating a new, solid pegbox? Or do you feel that's too invasive for this instrument?
|
|
#108
01-26-2011, 12:58 PM
|
||||
|
||||
|
Running the graft all the way up there seems like a smooth maneuver but it looks like something has to be done with the back of the pegbox up top as well, yes? I think I'd want to double the whole thing if so - perhaps in two operations, top (scroll/half pegbox) and bottom (half pegbox/neck graft)?
How about spiral bushing the peg holes too, long as we're at it... Anyway, nice clean-up job so far!
|
|
#109
01-26-2011, 03:16 PM
|
||||
|
||||
|
Have to admit that my strategy is not yet fully crystallised. I wanted to see how well the joint cleaned up first. Yes it will need re-cheeking and I'm fortunate that it isn't heavily figured wood, so the repair may be well hidden if I do it well. I'm not sure that simple bushing of the pegholes is going to strengthen things much. In the Strad Secrets book there's a nice conical bushing method a guy has developed - I really like it. But whether I want to get tooled up for just this repair I don't know.
Over here one of my biggest challenges is to find the wood for these repairs. If I'm going to use maple I have to find and import a neck block. If I use beech or sycamore, I may be able to find something here. Or I could use another wood entirely. Obviously beech was original. Any suggestions for a good supplier? Also important to remember this is a practical restoration to a working bass condition. There isn't the budget for an "as original" restoration. I really won't be able to save much if any of the original varnish. And since I am replacing the neck block, we may be converting this to a removable neck, too.
|
|
#110
01-26-2011, 03:21 PM
|
|||
|
|||
|
If it were my bass, I'd do what I did with my former Olde Tyrolean; repair the scroll, hang it on the wall, and install a new neck including scroll. The original scroll on my bass had a lot of character, but had been broken several times in several different ways; when the tuner plates were removed, it fell apart. In this case, practicality won out over sentiment.
|
|
#111
01-26-2011, 03:55 PM
|
||||
|
||||
|
Yes, that is an option I am considering too :-)
|
|
#112
01-27-2011, 05:07 AM
|
||||
|
||||
|
Quote:
Definitely interested to see what you come up with... and I trust you will fix it and not hang it on the wall... 
|
|
#113
01-27-2011, 05:15 AM
|
||||
|
||||
|
no the conical bushing removes a large conical section of wood on the inside of the cheek at each hole and then filled with a significant plug of new wood, then re-drilled. I doubt if a spiral bushing would do anything. usually they're just for reducing the size of the hole a bit.
|
|
#114
01-27-2011, 05:41 AM
|
||||
|
||||
|
Well, I hear the spiral bush is a good solution when the cheek is cracked through the peg hole. Clearly more significant on an instrument with a true peg that has to press in, sure, since it will perpetually open the crack - but also seems like a sound idea to me when we'd be talking about placing it inside of a plain bush anyway and the top half of the pegbox is broken off at the holes... Makes sense to me to put the pegbox as solid as possible with new wood, and then reinforce the spot where it broke (the holes) even more; clearly the original wood in that spot is less than ideal or the neck would have broken first and spared the pegbox, yes?
(Pure speculation of course - I'm not qualified!  ) )
|
|
#115
01-27-2011, 05:52 AM
|
||||
|
||||
|
i have never done a spiral bushing but as far as i know the technique uses a thin spiral of woodshaving in the hole. I fail to see how this can be a structural repair on a head this size!
Possibly better is to plug the hole, drill out a larger hole say 1" and plug THAT, then rebore the shaft hole in the new wood. The conical bushing is a variant of this and I think nicer. But I'm not sure yet that's what's needed here.
|
|
#116
01-27-2011, 05:57 AM
|
||||
|
||||
|
Nor do I know what is ideal in this situation.
 But the deal with the spiral bush is all in the grain orientation - you're placing the long grain of the "slice" perpendicular to the grains that have split across the peg hole. So you have the wood fibers supporting the first (expanding) load of the peg, rather than the glue joint between grains.
|
|
#117
03-19-2011, 11:52 PM
|
|||
|
|||
|
It's been a while, and I'm sure I'm not the only one wondering how it's going.
|
|
#118
03-20-2011, 01:51 AM
|
||||
|
||||
|
OK so I've been a bit busy ... and now I need TWO pairs of specs for this sort of work
  remember this? The cracked block needed to be replaced. 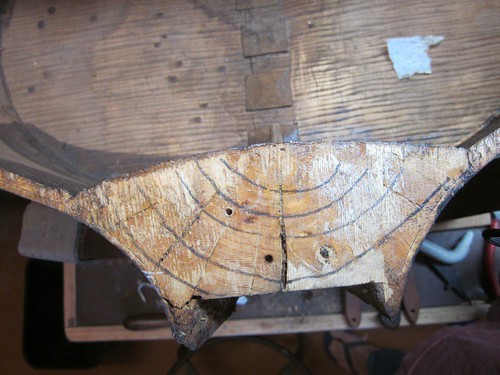 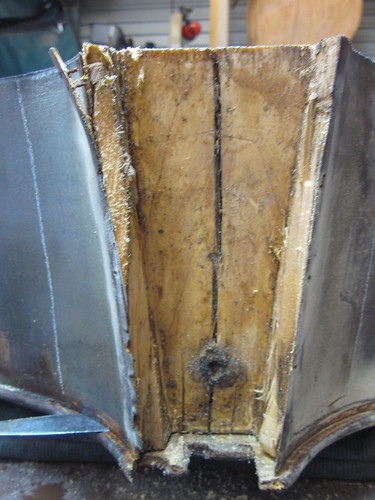 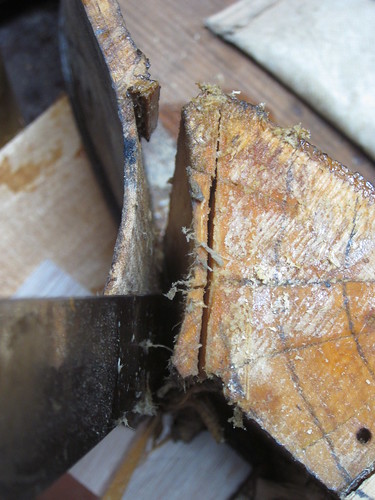 some twit used nails in the top edge of the ribs. 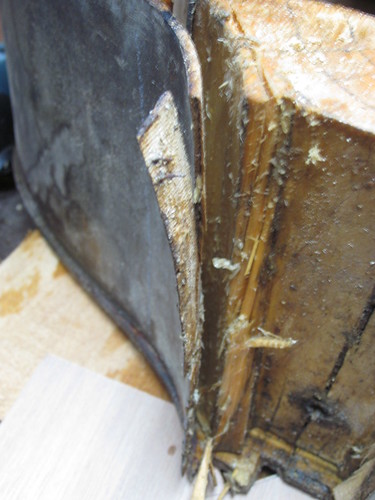 more ironwork for the collection! 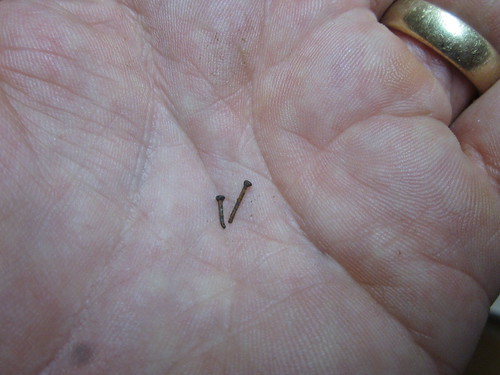 A lot of steam, water, heatgun, leverage and cursing later, the block came away with the ribs unscathed. 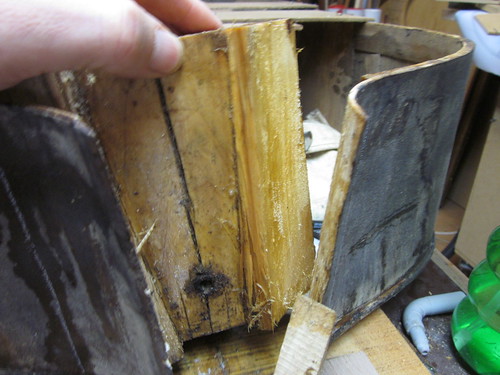 
|
|
#119
03-20-2011, 01:51 AM
|
||||
|
||||
|
remember what it used to be like in there?
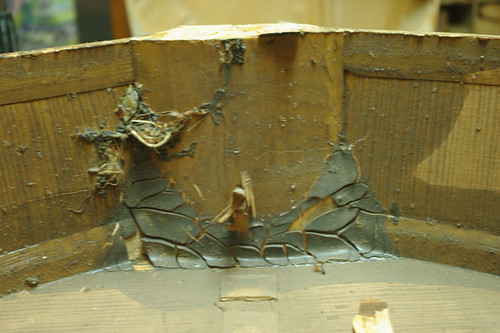 YUK! All that black crap had to be wetted, heated and scraped off. 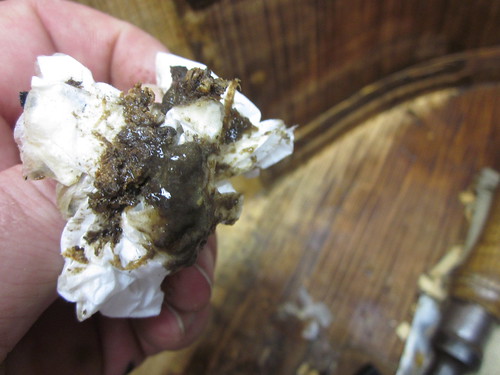  here is the new block being glued in with temporary cauls. 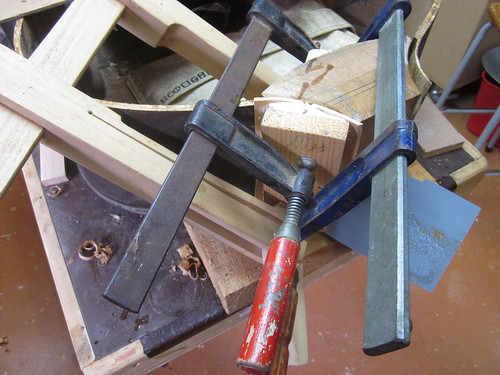 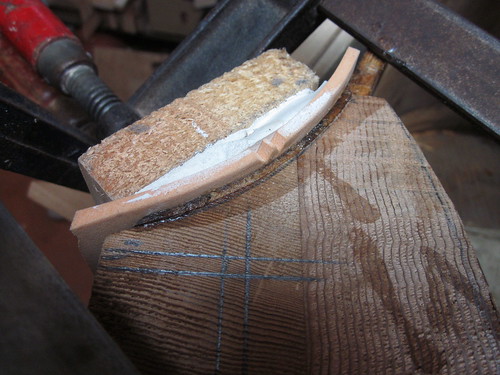 Yes its a multi-piece block. You can see how the upper edge has been damaged by those pesky nails. 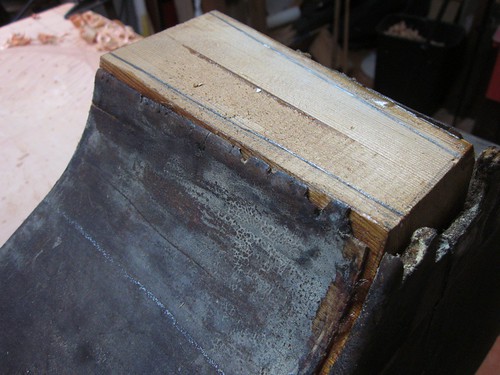 I'll have to trim those rib edges off neatly. I'll lose about a cm off the top of the original rib, but it is no big consequence. The block is intentionally oversized and will need some trimming too. 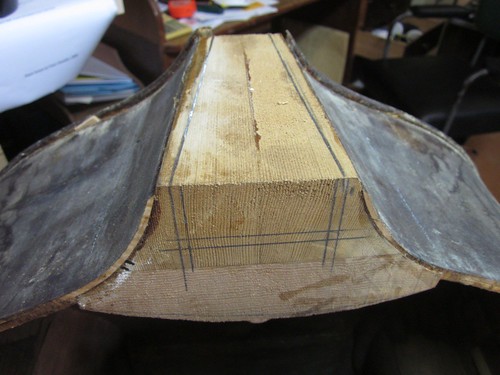 Last edited by Matthew Tucker; 03-20-2011 at 02:16 AM.
|
|
#120
03-20-2011, 10:45 AM
|
|||
|
|||
|
Thanks, Matthew-I'm sure I'm not the only one who's fascinated by and learning a great deal from your account of this major restoration.
|
 |
| Currently Active Users Viewing This Thread: 1 (0 members and 1 guests) | |
|
|


 Linear Mode

